
I know of quite a few people who have bought the astrophotography image processing software PixInsight (PI), but only use it for one or two specific features, such as the gradient removal tools, or merging mosaics. The common reasons/excuses given for not using it for their full processing workflow seem to be "there isn't sufficient documentation", "I tried it, but calibrating and stacking images was so tedious, I just want to click a few buttons and have my images stacked", and "I don't want to have to learn a whole new platform."
So I thought I'd write a little tutorial that will hopefully help ease those concerns. I decided a good subject to achieve that would be a howto on using and writing a BatchPreprocessing (BPP) template script, with lots of screenshots to make it easier for those who don't like books without pictures.
If you follow this tutorial and links provided, you should become a little more familiar with:
- some of the fundamental tools and usage of PI;
- the CosmeticCorrection module;
- the BatchPreprocessing script;
- how to create master frames libraries for bias and dark frames;
- how to create and name process icons;
- how to write a simple script;
- how to feature new scripts; and
- how to add scripts to your favourites.
Assumptions:
- You either have a licensed copy of PixInsight, or have a trial version;
- You have some raw bias and dark frames.
- You are at least a little familiar with the BPP script. I intend to post a BPP general usage tutorial shortly.
Let's get started.
Preparing the CosmeticCorrection process icon:
Open the CosmeticCorrection module (CC). It can be found by selecting "ImageCalibration->CosmeticCorrection" from either the Process menu in the top menu bar, or in the Process Explorer window (my preference). The CC module is designed to clean up any hot or cold pixels remaining in the image after bias, dark, and flat calibration. You might think that those normal calibrations would remove all hot and cold pixels, but I do still find some in my images. Could be because I use bias and dark libraries taken every few months. Either way, I think it's a good idea and will continue to use it.
For the purposes of creating a template, I just tick "AutoDetect" with the "Hot Sigma" and "Cold Sigma" values set to 3. That's it. We'll be doing master dark calibration elsewhere later, and I don't have any defects on my camera's sensor yet to need the defect list feature. If you feel you want to know more about the CC module's features, check out the thread on the PI Forum.
Drag the little blue triangle instance icon in the bottom left of CC's window onto the PI desktop to create a process icon. Process icons are a convenient way to keep the settings for a process and reuse later. And if you save them, they can be reused in another session at any time in the future. That's what we'll be doing. To see what they do, you can now close the CC window, then double click on the process icon. The CC window will open up again and it will have remembered your settings of autodetect and hot/cold sigma values.
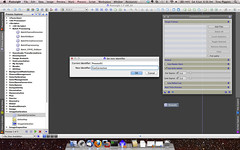
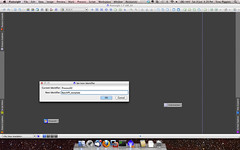
We should give the process icon a logical name so we know what it does. You can either right click on the icon and select "Set Icon Identifier...", or just click the tiny black "N" symbol on the top right of the icon. I've called mine "CosCorrection". See the above screenshot.
Create a master bias and master dark file:
You can skip this stage if you already have master biases and master darks.

I have found that since using a cooled CCD camera for astrophotography, with it's ability to control temperatures, it is very convenient to use master biases and darks. Not only does it save time on the night since you don't have to actually shoot them, and I found I'm using more frames and getting better results. For example, my master biases are created from 100 bias frames. If I was shooting them on the night, I'd probably limit the number to 10 or 20.
For darks, I'm using 30 minute long subs. That's much longer than what I typically shoot, and PI automatically scales darks down if you use shorter subs for your flats and light frames.
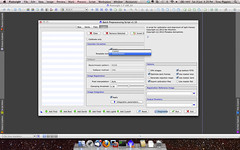
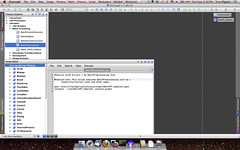
Start the BPP script ("Batch Processing->BatchPreprocessing"). Add your bias and dark files by clicking the "+ Add Bias" and "+Add Dark" buttons and navigating to the relevant files. Make sure you specify an "Output Directory" somewhere logical. That's pretty much it. Just click the "Run" button. It will probably give you a warning (see above screenshot), because you haven't selected any flat or light frames, but that's ok because we're only creating master biases and darks for now. Once the script has run, you'll find your new master files in the a subdirectory called "master" in the output directory you specified. You can now close the BPP script.
Prepare the BatchPreprocessing script:
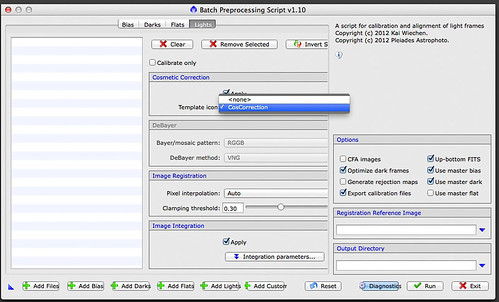
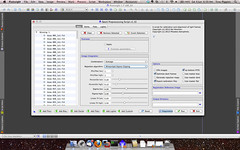
Start the BPP script ("Batch Processing->BatchPreprocessing"). Add your master bias and master dark files by clicking the "+ Add Bias" and "+Add Dark" buttons and navigating to the relevant masters. Since we're going to be using masters, tick the "Use master bias" and "Use master dark" boxes.
Now click on the "Lights" tab. Remember the CC process icon we created earlier? Here's where we use that. Tick the "Apply" box in the Cosmetic Correction section, and from the dropdown you select your process icon which you should see listed. See the above screenshot.
I shoot mono images, but if you have a one-shot colour camera, you might like to tick the "CFA" box and check the appropriate debayering settings in the "DeBayer" section of the "Lights" tab. This will just save you having to do that every time.
Save the process icons:
Once you're happy that all of the options you want as defaults for your BPP template, we're ready to create a process icon so that it can be saved for use later and used in a script. Just make sure you haven't selected a registration reference image or output directory path, because they will probably be different every time you run the template, and it's safer to leave them blank for now.
Create a BPP process icon and give it a logical name like "BatchPP_template" using the same method we did for the CC process icon above.

Now you can close all windows so that you are just left with our two process icons. What I did now, because I like things neat, is to right click on the desktop and select "Arrange Icons". This puts the process icons neatly in the corner so they're easier to find later. When we save the process icons, it not only remembers their settings, but also their positions on the desktop.

To save the process icons, right click on the desktop and choose "Process Icons->Save Process Icons..." and give them a logical name and location. I called mine "BatchPP_template.xpsm".
Create a command-line script file to open the template:

To create a script, you can use any plain text editor like Notepad or Vim, but PI has an in-built one which is very convenient and clever. Access it from the main menu "View->Script Editor" or the sidebar tab.
#feature-id My Scripts > My BatchPreprocessing Icon


#feature-info This script executes BatchPreprocessing with my \

  CosmeticCorrection icons and other magic.


open /Users/troy/Applications/pixinsight/BatchPP_template.xpsm

instance --icon=BatchPP_template -execute-global
Insert the above into a new command-line script file, changing the path and filename of your saved process icons on line 6, and on line 7 the icon name should match the name you gave your BPP process icon on the desktop. It's just a coincidence that both of mine are the same in these screenshots. They don't need to be the same. I'm just unimaginative.
The #feature-id directive allows the script to be found and featured by PI. The #feature-info directive is not necessary, but just makes things a little more self-explanatory in the list of featured scripts.
The "open..." line loads the saved process icons, and the "execute..." line actually runs the process icon once it's loaded and on the desktop.
Save the file with the file extension ".scp". I called mine "BatchPP_template.scp".
Feature your new script and add it to favourites:
Go to "Script->Feature Scripts..." in the menu, click "Add" and browse and choose the directory that contains your script file. You should get a notification that new scripts have been found, click "Done" and it should now appear in "Script->My Scripts->My BatchPreprocessing Icon".
To add the script to your favourites, simply right click on Process Explorer->Scripts->My Scripts->My BatchPreprocessing Icon and select "Add to Favourites".
Using your BatchPreprocessing template script:
Usage should be self-explanatory, just run the script from either your favourites (if you added it there), or from the path you set in the #feature-id directive above. The BPP script will open up and have your default master bias and darks already filled in, and CC and CFA settings in place already. You will still need to add your flats and lights, specify your reference image for aligning, and the output directory. That's it, just click "Run".
Cool tut Troy.
ReplyDeleteGreat tutorial, Troy. Thanks!
ReplyDeleteGreat tutorial,Thanks, just some caution to use longer darks would be if hot pixels saturate, then they will not scale and leave a hot pixel in the calibrated sub.
ReplyDeleteGood point, Magnus. Wasn't aware that saturated pixels didn't scale. Shouldn't be an issue, as the CosmeticCorrection should handle most cases of straggling hot and cold pixels.
DeleteGreat tutorial,Thanks, just some caution to use longer darks would be if hot pixels saturate, then they will not scale and leave a hot pixel in the calibrated sub.
ReplyDeleteThis is a great resource Troy. I always find myself digging back through my notes trying to remember how to optimise pre-processing. This is a big help. (RobF)
ReplyDelete